Things to Consider ✅
- To create and modify Live Chat Widgets, users must be an admin in Orlo and enable the 'Administer Accounts' permission in their user settings.
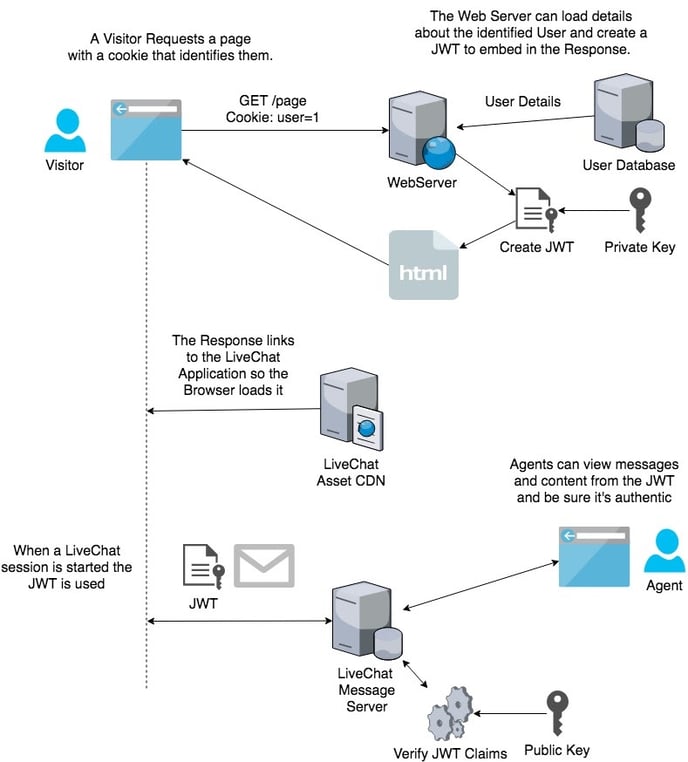
How it Works
To ensure the user data you send is secure and hasn't been tampered with, we use a process called data signing. You'll generate a unique digital "signature" using a special key before sending the data to our widget. We then verify this signature using another key to confirm the data's authenticity.
Here's a visual overview of the process:
Generate Your Secure Keys (RSA Key Pair)
Think of this as creating a unique lock and key for your data. We recommend generating a new pair of keys for each Live Chat widget for enhanced security, but you can use the same pair if you prefer.
Follow these steps on your server (not directly in your website or app code):
-
Generate a Private Key: This is your secret key and should never be shared.
openssl genrsa -out private.pem 2048 -
Extract the Public Key: This is the key you'll share with Orlo so we can verify the signature created with your private key.
openssl rsa -in private.pem -outform PEM -pubout -out public.pemThese commands will create two files:
private.pem(your private key) andpublic.pem(your public key).
Add Your Public Key to Orlo
You need to tell Orlo your public key so it can verify the data you send.
- Go to Settings in your Orlo account.
- Click on Manage your Live Chat Widgets.
3. Click Edit next to the specific widget you want to set up.
4. Under the Widget Security section, find the field labelled Your RSA public key (optional).

- Carefully copy and paste the entire contents of your
public.pemfile into this field. - Click Save Changes.
Embedding your Live Chat Widget to your Website
- Go to Settings in your Orlo account.
- Click on Manage your Live Chat Widgets.
3. Click Embed next to the specific widget you want to add.
To add your live chat widget to your website, you'll need to copy and paste a short block of HTML into the <head> section of your website.
You will then need to copy the unique HTML code under the  header. Once added to your website, this will show the start chat button you've previously created on your website.If you'd like to hide this button and use another element on your website to initiate the live chat, disable the button in the Live Chat widget settings and copy the code under the
 ![]() header and place it behind the on.click event for the desired element.
header and place it behind the on.click event for the desired element.
Important Security Note: Your private.pem file is highly sensitive. Never share it publicly or include it in your website or app's front-end code. Keep it securely stored on your server.
Prepare the User Data (JSON Object)
On your server (where your website or app's backend code runs), you need to create a piece of data in a specific format called JSON. This data will contain information about the logged-in user.
Minimum Required Data:
At a minimum, your JSON object must include the following:
{
  "name": "customer name",
  "isLoggedIn": true
}
name: The full name of the customer.isLoggedIn: A value oftrueif the user is currently logged in to your website or app.
Optional Data (Pre-fill Email):
You can also include the user's email address to automatically fill this field in the chat widget (if you've enabled it as a required field in your widget settings):
{
  "name": "customer name",
  "isLoggedIn": true,
  "email": "example@example.com"
}
If you don't provide the email here but have it set as a required field in your widget settings, the user will still be asked for it before they can chat.
Custom Data (Agent Information Sidebar):
You can include any extra information you think would be helpful for your customer service agent. The "key" you use in the JSON will be the label the agent sees in their chat sidebar. Use clear, readable labels (avoiding programming terms like camelCase or underscores).
{
  "name": "customer name",
  "isLoggedIn": true,
  "User ID": 124,
  "Telephone": "01234567890",
  "Account Type": "Premium"
}
Securely Sign the Data (JWT Token)
Now you need to create a secure "signature" for this JSON data using your private key. We use a standard method called JWT (JSON Web Tokens) for this. There are many libraries available in various programming languages that make this process easy.
- Learn more about JWT: https://jwt.io/introduction/
- JWT Specification: https://tools.ietf.org/html/rfc7519
The output of this signing process will be a single, long string (the JWT token). This token contains your user data along with the secure signature.
Send the JWT Token to the Live Chat Widget
Once you have generated the JWT token, you need to pass it to the Orlo Live Chat widget on your website or app.
For Websites (JavaScript):
You'll need to add some JavaScript code to your website. You can find a code snippet under the Customer data section in the second box when you go to Settings > Manage your Live Chat Widgets > click Embed.
Place this code anywhere on your webpage or run it after you've retrieved the JWT_TOKEN (for example, after an AJAX call to your server).
Important: Replace JWT_TOKEN in the code snippet with the actual JWT token you generated on your server.
For Mobile Applications:
-
Navigate to Settings > Manage your Live Chat Widgets > click Embed.
-
At the bottom, you'll find your Mobile URL Information. Choose the URL that includes
jwt. -
When you embed the live chat view in your mobile app, you will need to append parameters to this URL:
jwt: Replace this with the JWT token you generated.widgetId: Replace this with the actual ID of your Live Chat widget (found in the settings).
Your final URL in your mobile app might look something like this:
YOUR_MOBILE_URL_WITH_JWT?jwt=YOUR_GENERATED_JWT_TOKEN&widgetId=YOUR_WIDGET_ID
By following these steps, you can seamlessly pre-fill user details and provide valuable context to your agents, creating a smoother and more efficient live chat experience for your customers.