
If your website or app has the means to be able to know who the user is you can tell our live chat widget this information so the user does not have to fill this in when they come to chat. As well as being able to set the user’s details you can also pass through custom data for the customer service agent to see in the sidebar when chatting with the customer. This can help to reduce the time and hassle for a customer to chat with you and help the agents to create a better experience by knowing more about who they are.
Below is a flow diagram detailing how the process will work
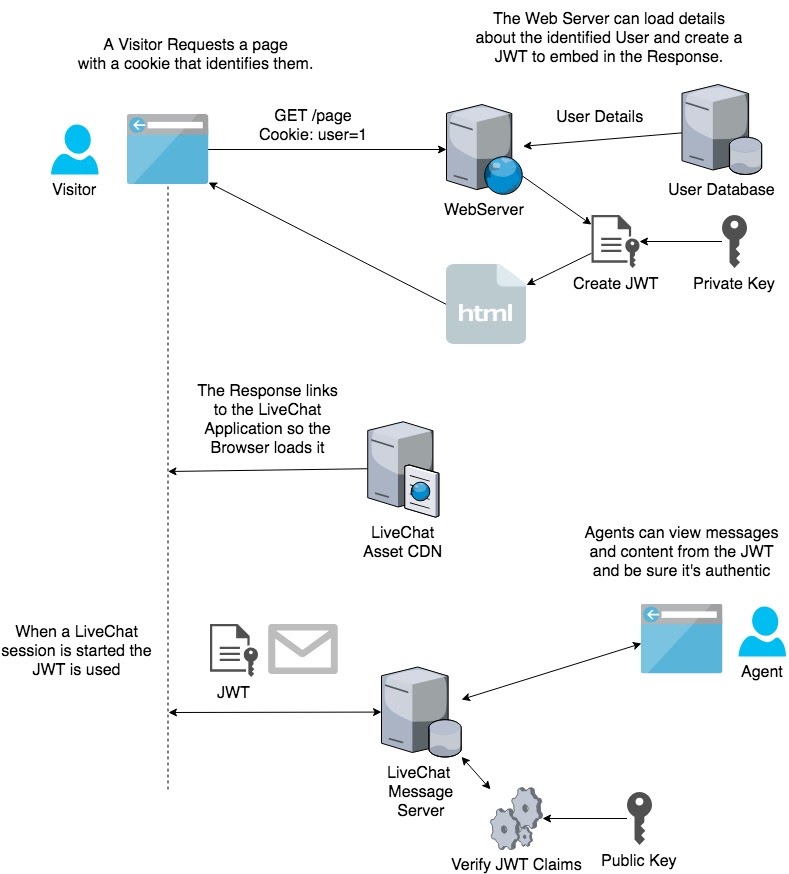
Setting up an RSA key pair
In order for us to do this, we need to know that that the data you’re sending us about the user is valid and has not been tampered with. To do this, you sign the data before you send it to us. To generate a private key we recommend the following steps. Note that we recommend doing this for each live chat widget but you can use the same one if you would like.
# openssl genrsa -out private.pem 2048
# openssl rsa -in private.pem -outform PEM -pubout -out public.pem
This will give you two files: your private key and your public key. You will need to copy and paste the contents of public.pem into the settings of the live chat by going to “Settings” > “Manage your Live Chat Widgets” and then clicking “Edit” next to the widget you want to set up. You will need to paste the entire contents of public.pem into the field “Your RSA public key (optional)” under “Security”.
Your private key should never be shared or displayed publicly.
What data can I send?
Minimum data
On your server (away from the user so not in your application or on your webpage in javascript) you will need to create a JSON object which contains a minimum of
{
name: “customer name”,
isLoggedIn: true
}
Where isLoggedIn indicates if the user is logged in to your site and the name is the customer's name.
Optional data
You can also set the field “email” which would auto-complete the user's email address for them which is an optional required field in the settings of your widget. If you do not set the “email” but you have required this in the settings the user will still be prompted for this before been able to chat with you. So for example
{
name: “customer name”,
isLoggedIn: true,
email: “example@example.com”
}
Custom data
You can also add extra data to the JSON object such as the user's ID or their telephone number or any other such information you like. Please note the key is what will be displayed in the user interface for the agent, to make it readable try to not use programming notation such as camel case or underscores. So for example
{
name: “customer name”,
isLoggedIn: true,
“User ID”: 124,
“Telephone”: “01234567890”,
“Custom field 1”: “value”
}
Signing the data
In this step we’ll be signing the data using JWT tokens there are a number of libraries available to make this easier, however, if this is new to you this is a nice starting point: https://jwt.io/introduction/ and the specification can be found here: https://tools.ietf.org/html/rfc7519
Now that you have your JSON object with your data you will need to sign this with your private key before passing it into the widget. We use JWT tokens to sign the data using the previously generated private key which we will then check using the public key later.
The end result of signing your data should be one long string which we’re going to pass into the widget.
Sending the data to the widget
Once you created your data, signed it with your private key you can now set this on the widget.
Websites via Javascript
You will need code in the second box under “Settings” > “Manage your Live Chat Widgets” and then click “Embed” where you will find the code to use underneath the “Customer data” section. You can place this code anywhere or your website or run as a result of calling an ajax function to get your JWT_TOKEN.
Mobile applications
You will need to get the unique URL that you are embedding in your app, to do this If you navigate to “Settings” > “Manage your Live Chat Widgets” and then click “Embed” where you will find your mobile URL information at the bottom and choose the one with the jwt
You will need to replace JWT_TOKEN with the generated JWT token created from above and the WIDGET_ID with the ID of the widget found in the settings.
